
Seagate Backup Plus Portable Drive
Recently, I have upgraded my homelab – yet again. There will be an oncoming post about the hardware I chose and how it is set up. This time, my lab is mobile. I can take it with me on the road or leave it at home.
One of the features that I wanted to be able to capture and utilize was VMware Data Protection (vDP) to backup my Infrastructure and Important VMs. However, there was a small hurdle that I needed to overcome – storage – and how do I make it mobile. VDP requires – at minimum, a 2TB datastore for backup storage. Normally, you would utilize your storage array and carve out some space for the backups; I wanted to see if I could do something different – something radical. I wanted to use my USB3 USB drive.
Now before I proceed further, I must state this disclaimer:
DO NOT TRY THIS IN A PRODUCTION ENVIRONMENT! I repeat, DO NOT ATTEMPT THIS IN A PRODUCTION ENVIRONMENT! This is NOT supported by VMware and if you have problems – you are on your own. This is not how VMware expects their products to be consumed. You should follow VMware best practices and always utilize supported hardware from the VMware Hardware Compatibility List (HCL). You may experience performance issues or other behavior that cannot be explained.
Also please note: Some of the commands and scripts listed below scroll off the page. This is due to the code highlighter plugin used with this version of wordpress. You may need to scroll to the right within the code box to see all of the code.
I got the inspiration from a recent blog by William Lam on Home Labs made easier with VSAN 6.0 + USB Disks. I thought that if USB drives could be used for VSAN, then there must be a way to consume them from the ESXi. Turns out, there is. But I had to cobble together a few blog posts to be able to do it.
Here are the steps that I followed.
Step 1 – Open a PuTTY session to your ESXi host. Disable the USB Arbitrator service. This service prevents the ESXi host from seeing USB Devices.
/etc/init.d/usbarbitrator stop
Disable the service from starting back up when you reboot the Host with this command.
Step 2 – Plug your USB device into the ESXi host.
If you already had it plugged in, unplug/replug it. (I had to do that for my host to see the drive.)
Check for the drive using the command.
vdq -q
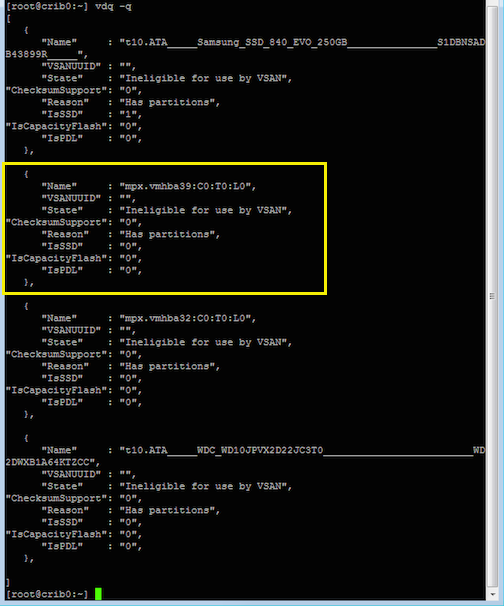
vdq -q
The highlighted section shows the drive that I want to use (“mpx.vmhba39:C0:T0:L0”). Your drive may be different. You can validate this is your drive to use by unplugging the drive, rerunning the command, and replugging the drive. You can also check the storage adapters within the Web Client or the C Client to validate sizing, etc. Looking at our example in the picture, this drive already has an NTFS partition. I will need to remove this partition so that I can reformat the drive for VMFS5.
You will notice the other USB drive listed as “mpx.vmhba32:C0:T0:L0”. This is the USB thumb drive that I installed the ESXi host OS onto.
Step 3 – From another post of William Lam’s called How to Format and Create VMFS5 Volume using the CLI in ESXi 5, and one from the Tech Repository VMware: Using the partedUtil commandline utility on ESX and ESXi, I was able to scrap together the instructions needed to format the USB drive.
Using the below command, presented me with the information about the partition table of the drive
partedUtil getptbl /dev/disks/mpx.vmhba39:C0:T0:L0

[root@crib0:~] partedUtil getptbl /dev/disks/mpx.vmhba39:C0:T0:L0
gpt
243201 255 63 3907029167
1 63 286487144 0
The line “1 63 286487144 0” (And don’t quote me on the numbers, I forgot to grab a screen cap.) is the line representing the partition. The line above displays the sector information of the drive.
Step 4 – Run the below command to remove the partition.
[root@crib0:~] partedUtil delete /dev/disks/mpx.vmhba39:C0:T0:L0 1
Step 5 – At this point, the drive has no partitions, and rerunning the command “vdq -q” will display the drives but will show a “USB disk” Reason for “mpx.vmhba39:C0:T0:L0”.
Formatting the drive will require some math skills – as calculating the beginning and end sectors of the drive is needed. The ‘Tech Respository’ has some good information on drive sectors, and breaks down how to calculate them. In addition to the math that is needed, we also need to know the GUID type that is required for VMFS.
Going back to William Lam’s VMFS post, he has a script that can calculate the sectors during the format. He also lists the GUID that is needed for VMFS (“AA31E02A400F11DB9590000C2911D1B8”).
Using William’s script as is will cause problems for me though. Therefore, I had to modify it. I will break down each line.
[root@crib0:~] partedUtil mklabel /dev/disks/mpx.vmhba39:C0:T0:L0 gpt
This set the label to be ‘GPT’.
[root@crib0:~] END_SECTOR=$(eval expr $(partedUtil getptbl /dev/disks/mpx.vmhba39:C0:T0:L0 | tail -1 | awk '{print $1 " \\* " $2 " \\* " $3}') - 1)
We calculate the sectors of the drive and set the variable “END_SECTOR” accordingly.
[root@crib0:~] partedUtil "setptbl" "/dev/disks/mpx.vmhba39:C0:T0:L0" "gpt" "1 2048 ${END_SECTOR} AA31E02A400F11DB9590000C2911D1B8 0"
Now we have created a VMFS partition using the correct VMFS GUID type and set the starting sector for 1MB alignment.
[root@crib0:~] vmkfstools -C vmfs5 -b 1m -S LOCAL-USB /dev/disks/mpx.vmhba39:C0:T0:L0:1
Lastly, we create the VMFS Datastore using vmkfstools. If you want to change the name of your datastore, then substitute “LOCAL-USB” for your naming scheme.
Step 6 – Check the partition name by rerunning the command:
partedUtil getptbl /dev/disks/mpx.vmhba39:C0:T0:L0

[root@crib0:~] partedUtil getptbl /dev/disks/mpx.vmhba39:C0:T0:L0
gpt
243201 255 63 3907029167
1 2048 3907024064 AA31E02A400F11DB9590000C2911D1B8 vmfs 0
You will also need to refresh the client to view the datastore that was just created.
You should see your new datastore populated within the client.

VI Client Datastore View

I exactly need this article to perform a disk swap. Thanks!
“The device /dev/disks/mpx.vmhba40:C0:T0:L0 has zero length, and can’t possibly store a file system or partition table. Perhaps you selected the wrong device?”
I always get this error when I try the partedUtil command on my device.
I have a WD elements 25A3. Is it not supported for esxi6?
I’m getting a Permission denied. (Have you set the partition type to 0xfb?)
Error: Permission denied
at the last step and can’t figure out why